Pages

Monday, February 27, 2012

Valentine Decor

I know, I am a little behind the times. But in this case, I figured "better late than never" would be acceptable. Now you can have a few ideas to think about for next year.
 It doesn't get much easier than this. Print and frame. Unless of course, your computer is out of color ink, like mine was, in which case it is print, color in with sharpie, frame. I got the art here.
 This one I saw in the background of another picture (here) and thought "I can do that". I took a frame and removed the glass, strung some ribbon, and taped on hearts. (In all honesty, I should have gone with the wider hearts or strung four rows, but oh well).
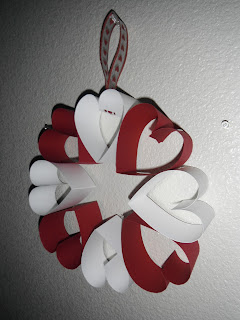
This was another fairly simple project- I cut out strips of cardstock 2" wide (11.5" long), folded them in half, and stapled the tops together like hearts, then stapled the hearts together to form the wreath. Add a ribbon to hang in one of the hearts and you are done. That idea came from here. The instructions say to use glue dots, but the glue dots weren't working out so well, so I ended up just stapling everything.

Reading Nook

This is a project I was quite pleased with how it turned out. I have been wanting to create a nice little reading nook for a while. I have all sorts of grandiose ideas of how I want it to be. Two problems- space and money. The ideas in my head were not working with my current house floor plan, and I am saving up for a fence. Extraneous home items just were not in the budget.
The other morning I was feeling a little impatient and decided that I wanted my reading corner NOW. I cleared out a corner in my living room and went to work. To make the area more distinct, I brought in a rug that has been in the garage for the past couple of years. I took the doors off a cabinet and brought in all the children books I could find. While I was putting them on the shelf I came across some Sesame Street flashcards that had been mailed as a sample. I stuck those in some clearance frames that have been lying around since at least last October. Instant wall art. For seating I grabbed the deflated beanbag chairs, and stuffed in some worn pillows to give them a little more life. I also brought in some ottoman storage things I had picked up at least three years ago from Target.
 I had wanted some wood letters that spelled "READ" but wood letters get a little pricey. Then I saw (on Pinterest of course) that you could iron letters onto your walls (here). Perfect. So for a grand total of $0, I was able to get my reading nook from things I already had around the house. It took a lot more ingenuity then if I had been able to do what I originally had planned, but it has completely been worth it. The kids have been spending a lot more time with their books. (When I get around to it, I have every intention of covering the cardboard box that is actually hiding the power cords to the TV and DVD player under my puzzle tote. It could happen.)

Along the same lines, while I was re-doing my living room I made a storage tote to put all the kid's illustrated scriptures in. Also free. I took a box, cut it to the size I wanted, and hot glued fabric on it. I then ironed on some letters to make it a little more exciting. It helps make things look a little more organized.

For All the Clips and Bows

This was another birthday present. Tis the season for birthday parties I guess. For this one, I decided to make a frame for hair clips and bows.
 It took me a while to find a frame that would work. I finally located this one at Michaels in the wood section- it is a 12x12 scrapbooking frame.
 First I painted it. If I hadn't forgotten that I had used up all of my sandpaper on the kitchen project and hadn't restocked, I would have sanded first.
 Next I hotglued ribbon from the back of the frame. I went with two different sizes, because hair clips come in many different sizes.
 Purely because I could, I covered up my lose ends with more ribbon. This step is entirely unnecessary, but gave the project a more finished look.
 This is how it looked from the front.
Finally I added embellishments and a couple of simple flower clips. Like my editing? I did that in Paint. Someday I shall get Photoshop. You can put whatever name you want on the frame, or just add more (or less) embellishments to suit your tastes or decorating scheme.

Hoppy Birthday

While over for a playdate, I found out that it was one of my children's friends birthdays that day. I started working on a present, but wasn't quite able to get it finished before she had to go home. That gave Kitty a chance to model it for me.
This cute apron is from the McCall collection- M6298 view D. Now I need to make Kitty and Monkey one of their own for their little kitchen (and get around to making that play food).

Another Dress

A couple of weeks ago I had a slight dilemma on my hands. It was Sunday, and the little Kitty was trying to wear something to church that wasn't going to work (I actually don't even remember what it was, but most likely it was something belonging to her little sister). How to get her to change without great tears and crankiness? So I decided to take some of the leftover fabric from the nursery dress and make Kitty a skirt- new clothes are always preferable to whatever she is currently wearing was my theory.  And I was correct, as soon as the skirt was done she happily shed the other outfit.
Sewing doesn't get much easier than this- it is three straight stitches (unless you french seam it, and then it is four). I took a strip of fabric, I am going to assume that it was 44"-45" wide, cut it into a rectangle (I held a tape measure up to the girl, and decided that 17" was how long I should cut the fabric out so my end strip was 17"x44". That measurement can be adjusted based on the intended recipient). I sewed the short sides together to form a tube, and then on the top side I stitched a casing for some elastic, and on the bottom side I put in a narrow hem. Instant skirt.
It worked. I had no trouble getting the girl to change.

Sunday, February 26, 2012

Popcorn Popping!

 I have been in going through a popcorn phase. The kind where I keep looking at recipes online for gourmet popcorn and drooling (which is actually a bit ridiculous if you think about it, since the doctor put me on a diet to lower my triglycerides and I haven't been able to actually eat any of the popcorn- my family has enjoyed my latest obsession). This first picture is just plain caramel popcorn- kind of like the stuff that comes out of those large canisters you can buy at holiday times. Since I grew up making the sticky kind (very tasty secret family recipe I should post someday, but definitely not until after I can eat some of it too), so it was fun to learn how to make the other kind. The recipe is just the first half of the last popcorn pictured.
 This would be the Reese's Peanut Butter Cup Popcorn from Two Peas & their Pod found here. The peanut butter lovers in the house enjoyed it.
This one is the second half of the popcorn pictured at the top- the Twix Caramel Popcorn (also Two Peas & their Pod here). The first time I didn't have any Twix to put in it, but I made sure to pick some up so I could make it again. There is just something about the thought of eating Twix and caramel popcorn at the same time that appeals to me. The official review- messy, but tasty (i.e. not for sharing with small children and their sticky fingers).

Valentine Garland

Oh the things you can do with a little felt and some wood beads. I found the template on Pinterest here. I confess, I didn't use the serious felt for this project, just the cheapo stuff. It would have been a little nicer in the thicker felt, but they didn't have that in the color I wanted. It also turned out a lot smaller than I expected, but still cute. 

Girl's Choice


Hello everyone! Sorry it has been so long since I have done anything. I know I can't claim being too busy, since all of the other contributors are mothers who have lives much more hectic than mine, and I don't really have an excuse for my slacking. Anyway, I promised I would put the pictures of the tee-shirts I made for Girl's Choice on the blog for my anxious sisters. The reason they say Guns and Roses is because for our date we went shooting at the range in Logan. Enough said, here they are!

For some reason, it won't let me comment so here is the answer to your question: I printed out the letters on a piece of cardstock paper and cut them out with an exacto knife. Then I taped them onto a plain black shirt and used a sponge with some white fabric paint to stencil the letters on. I did this on the day of the dance and I was running a little behind so I had to handwrite the red writing with a little tube of fabric paint in one of those squeezy bottles. They turned out better than I expected and the date was a ton of fun.

Thursday, February 9, 2012

Mulligatawny Soup

This is not my image, it was taken by mommyluvs2cook of allrecipes.com (http://allrecipes.com/cook/10446581/), but it looks rather a lot like mine did. Mine was darker because I substituted beef bouillon for chicken broth, and I added a lot more apples.

It's not even my recipe, it too was taken from allrecipes.com, more specifically from Lise P. (http://allrecipes.com/recipe/mulligatawny-soup-i/), but I wanted to share it because it's a tasty and hearty soup.

As I mentioned, I added more apples and used beef instead of chicken bouillon. If I had chicken bouillon, I would have definitely used it instead, but if you've only got beef, don't be afraid that it's going to ruin the soup. It definitely won't. I also forgot to buy celery and completely spaced adding the rice, so if you don't like those things, leave them out too. Also, rather than heating my heavy cream, I just added it to the soup at the end. I'm not sure what difference it makes, maybe none. This recipe doubled (minus rice and celery but plus an extra apple) comfortably filled my 5QT. stockpot.

Ingredients

  • 1/2 cup chopped onion
  • 2 stalks celery, chopped
  • 1 carrot, diced
  • 1/4 cup butter
  • 1 1/2 tablespoons all-purpose flour
  • 1 1/2 teaspoons curry powder
  • 4 cups chicken broth
  • 1/2 apple, cored and chopped
  • 1/4 cup white rice
  • 1 skinless, boneless chicken breast half - cut into cubes
  • salt to taste
  • ground black pepper to taste
  • 1 pinch dried thyme
  • 1/2 cup heavy cream, heated

Directions

  1. Saute onions, celery, carrot, and butter in a large soup pot. Add flour and curry, and cook 5 more minutes. Add chicken stock, mix well, and bring to a boil. Simmer about 1/2 hour.
  2. Add apple, rice, chicken, salt, pepper, and thyme. Simmer 15-20 minutes, or until rice is done.
  3. When serving, add hot cream.

Sunday, February 5, 2012

Valentine PJs

 This is what happens when you take a little girl into a fabric store with you- she finds her favorite fabric and holds on tighter than gorilla glue until you agree to get it for her. Fortunately, she has cute tastes. And it was 50% off.
 This is what happens when you try to get a picture of the pajama pants (McCall's M4643) you made a small girl- she becomes very wiggly and impossible to photograph. So look close and admire the little puppy dog that says "I Woof You".
This is what happens when you try to get TWO girls to hold still at the same time. No, they were not sleeping- great tears of sadness were being shed at the thought of having to snuggle.
This is what happens when you still have a little fabric left over after making the two pairs of pjs- the Kitty gets a doggy pillow. Which she loves and had to curl up with right away. I just used scraps I had lying around. I think I would like it better if the white part were red, but fortunately, Kitty doesn't care- she likes it just fine the way it is.
(My children might be a little spoiled- I prefer to use the term loved- which they don't agree with when I am sewing instead of holding them and catering to their every whim.)

Welcome to Nursery

Today marks a momentous occasion- it was the first time since having children that all three were in Primary. Monkey now gets to attend nursery, and I get to listen to what the teachers are saying in Sunday School (If the previous sentences made no sense, consider it your introduction into LDS lingo and look up Mormon.org to find some missionaries in your area to explain them to you). To celebrate this transition, this morning I got up and made Monkey a new dress for her first day in nursery. The pattern I used is Simplicity 5695 View B. Thanks to a wonderful husband who got took care of everything else while I sewed, I was able to get it done in time for church. I even made a quick headband since she is still lacking in the hair department.
The headband I just made up. I cut a long strip of fabric 2" thick and sewed it into a long tube. After turning it right side out, a inserted some elastic (oh so technical measuring technique- I wrapped it around her head to see how big, and took a few inches off so it would hold but not be too tight). I sewed the elastic together so that it formed a circle, and then ran a stitch across the fabric to close it (confusing writing I know, but not a complicated step).
The picture I got was not the greatest. That is what happens when you allow your subject to wear the article of clothing for several hours before taking the picture. That and she was more interested in watching the movie behind me than getting her picture taken. In person, she was much more adorable.

Confessions of a Slacker

I have a confession to make. I have a new nephew. OK, not so new- he is already over a month old (I have seen pictures- he is a cutie). And I was invited to the baby shower back in November. I have had the fabric since then (Tiger picked it out), but had a hard time getting going on this project. I finally decided that I was just going to have to do it. 
 Here is the nursing cover. I just used one that I have as a pattern outline. Basically it is just a rectangle of fabric with a strap that goes around the neck. There is some boning along the top edge so that Mom can see the baby, but nobody else can see what is under there. Simple, but oh so useful for the nursing mom. It also can double as a light blanket or a mat to set the baby on with a few toys.
 Here is the finished car seat cover. I think this is the reason it took so long for me to get around to this project. Originally, I was going to have some red fabric ruffled around the edges, but the red fabric I had just wasn't working for me. I also get a little intimidated when I have to actually measure things. Silly I know, but that is the way I work. I scrapped the red ruffle (boys don't like ruffles anyways, right?) and instead did an embroidery stitch that looked a little like stars around the edge. Now it is nice and manly (or as manly as something can get with blue hearts. The rocket ships counter balance those out). 
The inside view, with Elephant modeling. I used this tutorial for the measurements. Now my little nephew can be nice and cozy when he is out and about (since he does live in a colder climate then me).

More Flowers

Wednesday is craft day. If you happen to be in the Yuma area, and are looking for something to do on Wednesday come on over. This past Wednesday we made the fabric hair clips. They are cute, and easy, and a great way to use up those little scraps of fabric lying around.

Christmas Pajamas

I finally pinned down one child wearing the pajama bottoms that I was originally planning on making him for Christmas (McCall's M4643). I was only a month late. (OK, I confess, I still need to make Monkey's. It has been a busy week and I still haven't gotten to them).

Car/Train Play Mat (semi tutorial)

 Tiger got invited to a friend's birthday party and we needed a good idea for a gift to take. Fortunately, inspiration finally struck. Unfortunately, that didn't occur until the day before the party. The friend, like Tiger, is into trains and cars. I had seen a large playmat on Pinterest and thought with a little tweaking that would make a good idea. I made it smaller so that it was portable and could be taken places, and put a road and train tracks on one side so that it was like having a train table that you could take with you. I am sure that others have had the same idea, but since I couldn't find evidence in my quick search, I shall share how I made mine. 
 First, I made a circle pattern. I took a sheet of newspaper and using a string in the center with a pen on the end made the largest circle that I could. I then cut out two- one out of my backing fabric (the cute trains).
 and one out of my inside fabric.
 I laid out my road and track plan (the tracks are bias tape cut 2 1/2", the road I free-handed from a sheet of felt. The trees and lake were also free-handed.)
 After deciding on my placement, I used stitch witchery to tack my tracks in place (I set them 2" inside my circle), and then sewed around every track. It is a little time consuming, but will keep the track in place and makes the mat washable and durable.
 Once my tracks were in place I added "rails" with some silver baby ric rac. I just held it in place as I stitched, trying to keep it about the same distance from the edge of each track so that it was even.
 Once the track was finished I sewed around the felt road, lake, and trees. I used a close zig zag stitch to make the lines in the center of the road, and one of the swoopy stitches on my machine to make the waves in the lake. If I had more time, I would have embellished it a little more.
When the play area was finished I took some quilt binding and sewed around the playmat and the backing. I added some grommets and ran a rope through (actually I used some narrow bias tape- not recommended) so that the mat could be cinched up into a bag to carry the trains and cars. If I was going to do this again, I would use bigger grommets and a smoother drawstring. 
The finished product, with only half an hour before party time. We were only a couple of minutes late.

Foolproof Whole Wheat Bread

On Sundays, my husband likes to bake bread. He uses a recipe he got from his mother, and it is a good one. The beauty of this recipe (besides being tasty) is that it only has to rise once- making it not such a chore to enjoy homemade bread- with homemade jam if you are lucky.

(I should probably specify that my Honey cuts this recipe in half, and he uses about half white and half whole wheat flour.)

Foolproof Whole Wheat Bread (makes 4 loaves)
2TBS dry yeast
1/2 C warm water
5 C warm water
2 TBS salt ( I only put in one tbs of salt)
2/3 C oil (optional)
2/3 C honey or sugar
12 C whole wheat flour ( You can substitute a couple of cups of white flour or gluten)
Sprinkle yeast into the 1/2 C warm water.  Let stand 10-15 minutes. (1 TBS sugar or honey in the water will help the yeast work faster)
Combine hot tap water and 7 C whole wheat flour.  Mix on low speed until blended.
Add salt, oil, and honey.  Continue to mix until well blended.  Add 1 C flour to mixture.  Add prepared yeast to mixture and blend throughly.
Add 3 - 4 C more flour to mixture.  Knead for 10 minutes on low, or until dough begins to clean the sides of the bowl and is the consistency of cookie dough. (Flour amount will vary due to protein content of wheat.  A stickier dough will cause a more moist bread.)
Oil hands. ( Water on hands works too)  Remove dough from Mixer 1/4 at a time. Mold into loaves on oiled counter.  Place in greased pans.  Oil top of loaves if soft crust is disired.  Cover loaves with damp cloth.  Let rise 1/3 in bulk for approximately 35 minutes.
Bake at 350 degrees for 40-45 minutes.  Remove from pans.  Put on rack to cool.  Brush tops with butter or oil.