Pages

Showing posts with label costumes. Show all posts

Friday, October 31, 2014

A Frozen Halloween

We just got back from Trick-or-Treating with the kids. Other than being a bit on the warm side, I think they had a great time, and they loved their costumes. This year I actually purchased patterns for the girls dresses (from Joy2Sew- love this site). I have been way too busy lately for my own good, and these patterns were the closest I saw to what I had in my head.
 The Kristoff costume I free-handed, but I got a lot of my inspiration from here.
 They didn't quite understand "Stand back to back".
 The little Anna LOVES her costume. Not bad considering I decided this afternoon that she needed the cape. I curved the edges of the pattern, and simplified things by just using ric rac for the embellishment, but the results were worth it- Monkey wouldn't take off her cloak. The hat liked to flare up, so I ended up pinning it to her yarn wig (sort of like this one).
 Elsa also loved her costume. I loved that the train was detachable so I could take it off when she wanted to run all around- especially since she wanted it nice and long. The wig tutorial came from here). I used fabric paint to get the arm detail.
 Poor Kristoff- I thought he was going to roast in his costume. We need to move somewhere cooler for next Halloween. Either that or we need to go as surfers or something like that. Even though it was hot, Tiger still liked his costume. You can't see it, but it even had an elbow patch on the sleeve. I didn't make it to lining the top of his boots with fur, but he didn't seem to mind. I had a hard time finding the right colors. His shirt I ended up making from an XL men's shirt- when you have JoAnn's and Walmart to choose from, the fabric selection can get a bit limited. The fur on his collar is actually white and I took an old tooth brush and some black paint to color it- I think it worked out pretty well.
 I liked how the Elsa shoes turned out. I found the jelly shoes at Target- they had some princess bow thing on the front that I clipped off. I then used fabric paint and free-handed and Elsa-esque pattern onto the front and sprinkled it heavily with glitter. 
And this picture is so that I can remember next year how I made the little witch hats for the party we were invited too. Hershey Kisses, Grasshopper cookies, frosting, and some star sprinkles. They were tasty. Inspiration from here.

And just for fun- how they really used their costumes. They are silly:)


Friday, November 1, 2013

Halloween 2013

I apologize for disappearing. I have been crazy busy. As in, almost institutionalizable, crazy busy. I was in charge of a Super Saturday crafting event that consumed most of my time, and as soon as that was over I had about a day and a half to throw together the family Halloween costumes before the ward Trunk-or-Treat. Let us just say that I had to let go of my perfectionistic desires and accept that I wasn't going to wear these to Comic Con- just going trick-or-treating.
We tried for a quick family photo. For some reason, those never turn out. Want proof?
Hopefully soon we will get a better one. Until then, there you have it- Luke, Leia, their Mom and Dad, and Yoda. Perhaps next year Monkey won't cross-dress for Halloween:)
Tiger loved his costume. He went around telling everyone he was Luke Skywalker.
He took his role as a Jedi very seriously and refused to smile for any pictures. (He was quite into posing though).
Kitty liked being Princess "Arreya"
She did come home from her preschool celebration looking a little bit more like Darth Maul though. Fortunately, she let me wipe it off before she went trick-or-treating.
This little girl really got into the trick-or-treating experience. Long after the other two were done and sorting through their loot, she was still out on the streets. I kept asking if she was done and she would say no and carry on. I finally had to point out that most of the lights were out and it was time to go home.
Monkey was the cutest little Yoda ever. She really liked her three fingered "monster"gloves.
She also quite enjoyed eating the spoils of her labor. If she had her way, she would have already finished off her, Tiger, and Kitty's treat stashes.
And for fun, here is the cake that I made for a friend who has a Halloween birthday.
 I was feeling a little candy corn inspiration for the inside. It was made with a white cake mix (half dyed yellow) and a Pumpkin cake mix. I layered it with a light cream cheese frosting and then covered the outside with the Wilton Buttercream icing.
It was quite tasty. I may have eaten more than I should. But that is usually the case:)

Wednesday, October 16, 2013

A Long Time Ago...

A long time ago (a few weeks at least), in a galaxy right here, we decided to go with a Star Wars theme for our family Halloween costumes this year. This may have involved Mom needing to watch some movies so that she knew what was going on. But now that I am all caught up:)...
I have procrastinated working on their costumes until yesterday. While I was making the beaver hat for Kevin, I had the thought that I could adapt the pattern slightly and make Kitty a nice wig with some instant side buns.
 I finished it after she had already gone to bed and resisted the urge to wake a sleeping child. This morning she found it and knew it was hers and had to put it on. She can't wait to be "Princess Arayah" (those darn L's are so hard to say when you are little).
This hat is actually quite warm. It is too bad we don't live somewhere cooler- this would be the perfect answer to how to stay warm and still show off your Halloween costume.

Tuesday, January 22, 2013

Where has the time gone?

  The last several years seem to have just flown by. Particularly the last month. It has been a busy one. What have I been up to you ask? Well, for starters there were Christmas presents to be made. If I was better about getting them done before the last minute I would have more pictures to post. I did get a picture of this crayon roll I made my niece.

Since we were further up north where it actually snows, a snowman was also made (I confess, it was mostly Tiger and my husband, with a little help from Kitty- I stayed inside).
As soon as we got back, Kevin and I were a Ma and Pa for the Trek in our stake. I sewed a couple of dresses for that (someday I shall get the pictures of those, but none were on my camera). However, the stake hosted a family trek activity on Saturday. That morning I made Kitty and Monkey bonnets and matching skirts. The aprons were the ones they wore in a pilgrim and Indian themed extended family photo (sorry- I don't have the copyright to those pictures). They were cute little pioneer girls.
Since then, I have been focusing on the Pinewood Derby, which is rapidly approaching. So far, I have:
Clipboards (I spray painted the tops of cheap wood ones red, then ran a strip of duct tape along the bottom, and covered the back with contact paper) 
 Signs: I spray painted thin canvas boards, ran a strip of duct tape, and used my new Silhouette (my husband loves me and got me one for Christmas) to cut out vinyl lettering.
 I also made some bean bags with some scraps of fabric for a bean bag toss.
There is still much left to do, so pardon me if I disappear for a while again.

Tuesday, November 13, 2012

Pioneer Children (ate lot's of Halloween Candy)

 A few months ago, a friend called and asked if I would sew a pioneer dress for their daughter- they had just been to Nauvoo and she wanted to be a Pioneer Girl for Halloween.
She picked out the fabric, and I sewed the dress, apron, bonnet, and bloomers (Simplicity 3725). With some of the leftover fabric I made a little rag doll.
I didn't have a pattern for the doll- I just took one that Kitty had and copied it the best I could. The little pioneer was adorable at the Ward Trunk-or-Treat

Friday, November 2, 2012

Na Na Na Na Na Na Na Na BATMAN!

Every year it seems like I am rushing at the last minute to finish the Halloween costumes. This year, I swore, was going to be different. I was going to be finished well in advance so that I could enjoy the day at a nice leisurely pace. I need to stop swearing. This year I ended up being even further behind than usual (if possible). The drawback to finishing your kids' Halloween costumes as you are rushing out the door, is that it doesn't make for a very productive photo shoot. (The other drawback is that you forget things- like Catwoman's hood that was laying on the living room floor, instead of on her head for the Trunk-or-Treat). So please pardon the lack of professional photography- we were busy chasing superheros on Halloween. We also failed to get a family photo :(
Catwoman and Batman
Kitty as Catwoman, complete with Isis. I actually had most of her costume done ahead of time. She looks super cute with her Catwoman hood on as well. Batman's costume mostly materialized on Halloween day. The night before I whipped together his shirt, so by the time he left for school in the morning all he had to wear was a shirt and the mask which I made months ago. He added a different cape to wear to school, so while he was gone I sewed the pants, belt, gloves, boot covers, and cape. I actually have a hood for him, but he refuses to wear it. The black stocking cap was his idea.
Robin
Monkey made an adorable Robin. I had most of her costume made a week ago, and just had to make her cape and boots and mask. I couldn't find any more little kid gloves (the joys of living in an area where it is 87 degrees on Halloween night) so she went bare-fingered. Their trick-or-treat bags I was whipping out as we were running out the door.
 For this year's parental matching t-shirtness, we went as comic book pages. We thought they were fun, but I don't think many people noticed, or realized what they were. I was finishing them with only about 15 minutes to go before party time.
Hopefully I will be able to get better pictures when we go to get the family portrait done. Now I really need to clean my house. Let us just say that it looks like an explosion went off in a fabric store, and I need to go and sort through the rubble.

(a few more pics for you to enjoy)


Sunday, May 20, 2012

Felt Eye Patches

For the pirate party, I wanted eye patches. Every good pirate has at least one eye patch (and two in the case of the one pirate in How I Became a Pirate). But I HATE those cheap, plastic eye patches that are so uncomfortable to wear. Maybe that is a bit strong, but I really don't like them. So I decided to make my own. As a bonus, they ended up being so much cheaper to just make, and they are extra comfy to wear. What's not to like? I went through a couple of designs before I finally came up with this one using black felt, 1/4" elastic, and an empty soda bottle.
I found an eye patch  to use as my template. It turns out, bigger eye patches are a lot more comfortable than the smaller ones. For each eye patch, I cut out two pieces of felt. I then made a second eye patch template about 1/8"-3/16" narrower on all sides and cut those out of a plastic bottle (I think this one held root beer at one point- I guess that makes this an upcycled project).
 The plastic is to help give the patch a little form so that it doesn't press against your eye (very uncomfortable, trust me), I cut a slit half way up, and hot glued it over on itself. 
 So that my patch would also be more rounded I sewed a dart in it. I just folded the felt in half, and starting in the middle, sewed a slightly angled line. It is possible this step could be skipped since the plastic makes the eye patch rounded, but since I didn't ever try it that way, I don't know.
 I repeated the above step for the back side of the patch.
 Then I sewed them together, making sure to insert a piece of elastic in the top "corners" (also making sure the elastic formed an untwisted loop). I would sew along one edge (about 1/8" seam allowance so that the plastic fits inside), then insert the plastic and finish sewing around the remainder of the patch. I believe I cut my elastic (1/4" black) at 14 1/2", but that measurement can be adjusted based on your pirate's head circumference.
For durability, where I slid the elastic in I reinforced my seams by going over it a couple of times. 
There you have it: inexpensive, comfortable felt eye patches. I contemplated painting on some skulls and crossbones, or cutting something out with my Cricut to iron on (that would need to be done after sewing the dart, but before inserting the plastic), but decided to just leave them plain, but if you want to jazz them up you are more than welcome to. Whatever floats your boat (which any good pirate can tell you- it is a very good thing to have your boat float).

NOTE:
The eye patch template here is about the same size as what my plastic inserts ended up being. Just draw a line about an 1/8"-3/16"" out around one of the patches and there is your felt patch template. I did make some using that template (with the dashed line being my plastic template) and they weren't too bad. They are just a little more comfortable in the larger size.

Thursday, April 26, 2012

Pirate Extraveganza- The Party Activities

It only took half a week, but I think I have finally caught up on my sleep. I figured it was probably about time that I posted the rest of the pictures from the party. I don't really feel comfortable posting pictures of other people's children without their permission, so I apologize for the lack of action shots. I also failed to charge the batteries in my camera before the party, so the majority of pictures were very gratefully taken by my wonderful mother-in-law.
I spent enough time in Cub Scouts to know that I would need a gathering activity while all of the kids were arriving, so that I didn't have them running wild all over the place. I found this pirate shoulder parrot craft at Disney's Family Fun. The kids had fun coloring their own parrots.
 Meanwhile, I had set up a simple photo booth to take their pictures. I had plans for a more elaborate backdrop, but ran out of time. Oh, well.
After everyone had made their parrots and gotten their picture taken, we introduced the Pirate Training Program and gave them each their own "treasure map" with outline. The guests were 4-5, so the treasure map was more for the sake of having a map than actually finding anything.
 First on the agenda was reading How I Became a Pirate by Melinda Long, illustrated by David Shannon. I love that book- the pictures are amazing. The kids were surprisingly attentive while I read the story to them. After the story, they all were given loot bags with pirate stickers in them (Walmart had some pirate party supplies).
 Next on the agenda was Pin the Eye Patch on the Pirate. I drew a picture of a pirate on poster board and covered it with contact paper for the backdrop. For the eye patches I cut out a patch shape (I used these as my pattern-there were other printables as well) and laminated them 
 The prize for everyone (cause pirates share their loot), was an eye patch, of course.
Eventually I will post my tutorial for how I made these.
The third activity was Sink the Pirate Ship with the bean bag cannonballs. The prize: cannonballs (Whoppers).
I created the labels in Word (circles 1.9" in diameter with a 7 width on the outside line) and cut them out with a 2" punch, and glued them on scrapbooking paper that I had cut into 3"x4" rectangles and folded over little bags that were 3" wide (I found these in the jewelry section at Walmart). Not that anyone noticed, but my candies were all in multiples of 5, just because I am OCD like that.
The next activity was a Cannonball Pop. 
I inserted five plastic gold coins in black balloons and blew them up (that is them in the garbage bags on the trampoline). The kids had to sit on their balloons and pop them to get their prize.
Next up was Walking the Plank (the wind might have taken out some of my sharks and waves). I cut the shark fins and waves out of foam board from the dollar store. I made bases from scraps of foam board that I hot glued on, and spray painted them.
Avast ye! The kids were pretty good at walking the plank.
The prize for this activity changed several times. What I really wanted were some gummy sharks. I could not find them anywhere in town. On-line, they were more expensive than I wanted to spend. Idea number 2 was some hooks for their hands. I found some online at Party City that were only 50 cents each. When I went to pick them up, I discovered that the Party City here had gone out of business. My mother-in-law checked at the Party City near her, only to find out they were being discontinued and were all sold out. That left me scrambling at the last minute to come up with something, hence more "gold" (Wearther's Original). If I had more time, I found a hook tutorial here that wasn't too cheesy)
 For Go Fish, I hung an old shower curtain on some PVC pipe that I hung from our First Up gazebo. I cut fish out (Cricut Paper Dolls Dress Up cartridge) and laminated and taped to the front. For extra color my brother-in-law and I taped up streamers.
My fishing pole was a dowel that I painted brown and used some jute twine with a clip attached to the end.
The prize: Swedish Fish.
Next up was a Buried Treasure dig. I filled an underbed storage tote with ring pops, necklaces, marbles, and coins left over from the Cannonball Pop, and covered it all with sand.
 I think everyone had fun digging for treasure. If I was to do this again, I think I would have used two totes to accommodate the number of pirates I had in attendance.
 Last on our list was X Marks the Spot.
 This activity went through several idea stages as well. I thought about actually burying a large treasure chest for the kids to dig up, but thought that would not be exciting (think 5 year-olds standing around watching one person dig). I thought about burying individual treasure chests for each to dig up, but I don't like sand that much. Finally, I was inspired by Easter Eggs. I glued tongue depressors together to form and X and spray painted them red (I made enough for each child to find one). My brother-in-law hid them in a designated area. The kids had to find an X which they could exchange for their personal treasure chest, which was filled with a pirate bandanna.
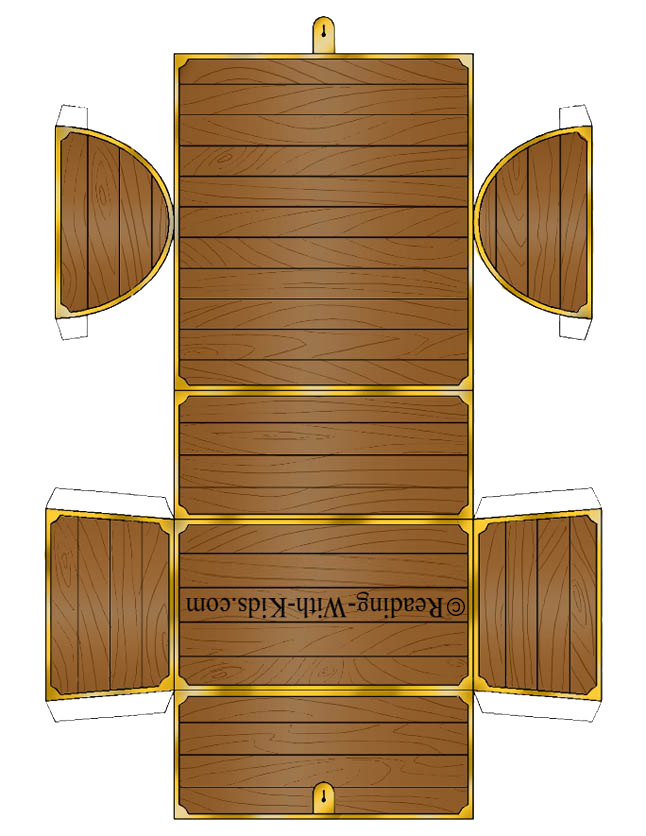
 The treasure chests I printed out here from this website. I cut them out, laminated them, and glued them together. I put a little piece of velcro on the lock to hold them closed.
 The bandannas I made using the Simplicity 2792 pattern (I made the large size). I should probably mention that the weather didn't cooperate for this party. The forecast called for 102 F of sizzling sunshine, and it was. Other than the heat, it turned out great. I had enough adults on hand to keep the kids from going wild, and enough kids to keep it just the right amount of party crazy.
 After they completed all of the activities, each child received their own Certificate of Completion, designating them as Pirates.
After becoming Pirates, it was present and food time. The timing worked out perfectly. We were just getting done eating when the parents arrived to take their little pirates home.
And one last picture, just because she was such a cute Pirate. Kitty had a great time at her brother's party. She was glad that one person wasn't able to make it, because being the silly mom I am, when I was planning all the activities, I just planned for the number of kids we invited, forgetting I had one more little girl here who would like to participate.